Showing posts with label pattern testing. Show all posts

September 12, 2023

Grainline Myra

 I don't even remember when I 'applied' to be a Grainline tester. But I will admit to being very surprised when I received an email asking if I was interested with the line drawing attached.


 I was hooked as soon as I saw the back detail and that incredibly interesting back yoke shape.

 I feel so honored to have been chosen to be on the testing team for the new Grainline Myra. It was my first time testing for Grainline and I hope it won't be my last.

 From Grainline's website: 

Myra is a sophisticated slip dress and top with angled seam detailing, a square neckline, and spaghetti straps.  Dress Myra up or down with your fabric choice, and select from three length options to make a Myra that's perfect for any occasion.  


 Myra calls for light to medium woven fabrics and I used a fairly lightweight stretch poplin from FabricMart. The fabric was part of my dryer stash, that I'm trying to work through.

The first thing I did was send the pattern file to LaQuana for printing.  I don't need to start a test with problems of my own creating. Q's shop is called BlueCupShop on etsy and she's quick and reasonable. She also reached out to ask questions when I've sent a file that's 6 pages to see if I really need to the B cup files! I appreciate that! 

 After referring to my project notebook that I am being religious about keeping in 2023, I can tell you that I made the following alterations, to fit me:

  • traced a size 18 at the bust graded to 20 at the hip;
  • added 2" to the length;
  • cut 4 straps so they were wide, the pattern has skinny straps
  • raised the side slits by 3"
  • added inseam pockets
  • removed 3 1/2" from the strap length, although I might have been a bit aggressive with shortening the straps.

This dress was an easy sew with a unique look. That lovely back yoke creates a really interesting back view.

And I don't even have back fat pushing out of the top of my dress! And I don't need more room in the back, I'm not standing up straight, I have one hip hitched to the side :)

 Myra feels like the sheath dress I've been trying to make forever! I have plans for more. I have a lovely burnt orange linen to make a version for my solids loving daughter and I have enough of this floral left to make the top version.

 Because I added length, I also increased the length of the side slits. Myra has slits on both side seams. If she wasn't so long, you could alternatively leave a slit in the center back seam.


Myra feels like all sass! At least in this bright floral version.

 Finally, in the interest of full disclosure. I should tell you that I've gifted this version to my solids loving daughter. And that I took all my own photos for this blog post.

August 7, 2023

Testing 1 - 2 - 3

 There is just something about testing. I don't know what it is, but I feel like one of the cool kids when I'm selected. Since first seeing the Collage Gather Top I have been intrigued by the Matchy Matchy Sewing Club. I also really like the Peplum Split Tank. So, when they sent out a testing call, I applied.

Remember when I said I loved gingham? Not lying. I bought way too much of each of these fabrics at a yard each to make a sample of the Skipper Top. I photographed my fabrics in the different locations on the top and ended up with this:


For my version, I made the top to wear with denim shorts. This is the summer that I don't care that my legs are ugly - they are good legs!
This was a very easy sew, once I figured out which fabric went where. The hardest part (for me) was putting the PDF together.

I think, all in all, I spent maybe 4 hours on this little top. I made View A and used the gathered front piece for Views B&C

As you can see, I used all red & white fabrics, a 1/4" gingham, a window pane plaid and a larger red & white plaid.

If I were to make it again, and honestly, I don't know that I will, I would add length to the front as a mock full bust adjustment. I realize the top is cropped, but it feels just a bit too cropped for me.

Also - I had to take these pictures by myself.  But hey - at least I'm still documenting my sewing - right?!

October 10, 2019

Andie Anorack

Earlier this year, Rebecca Page Patterns sent out a call for pattern testers and brand ambassadors.  I applied and was selected to be a pattern tester.  

The Andie Anorack was my first real test.  


This is a fairly simple anorack style jacket that can be made in just about any fabric.  The pattern offers you a jacket in two lengths - this 'car coat' length and a long raincoat.  Depending on the fabric you choose, you could have a proper raincoat.


This coat has a lot of firsts for me and while the fit isn't perfect - I'm pretty happy with it for a first coat.  And it's fully lined!


I can definitely see pull lines radiating from the back to toward the hip and from the bust to the hip.  But honestly, I feel like I have enough room.  


Will I make this pattern again - no.  Will I wear this coat?  Yes!  I love this fabric.  I've had it for years just waiting on the perfect pattern.  The fabric and pattern were a good match, I could have done better with the fitting.  


There are certainly things I didn't like about the pattern.  I think the hem should be deeper.  I found the directions for inserting the lining and the back neck confusing and ended up stitching those together by hand. I found some of the fitting directions very confusion.  

Finally - when will I learn to do an FBA rather than trying to grade between sizes?  


July 9, 2019

Blue Stripe Rivermont

I am a cashmerette tester - and for the most part I love it!  Any time I'm unhappy with the finished garment - well it's always my own fault.  No matter how many times I take my measurements and if I'm standing up or sitting down - I almost always come out with a garment that's too big the first go round.  

Take - my tester version of the Rivermont for example.  Too big - but it's super comfortable and snuggly warm and I wear it all winter!


This is my second version of the rivermont.  I wanted to try again and make a dress that was more my size!  The fabric is from Girl Charlee from 6 or more years ago!  I made a dress for my 50th birthday from the same fabric and couldn't part with the remaining fabric. 


For this Rivermont - I used a pretty ITY left over from making a concord for the pockets and I used the same ITY to bind the neckline and sleeve hems - pulling it all together.  Actually - I think I inserted it like flat piping (and I did a pretty crap-tastic job of it!) but you can't tell from a galloping horse, so . . . .

It's amazing what actually making something up in your size will do for you! I feel amazing when I wear this dress.  Also, having a photographer who makes you laugh, helps a lot!  


Pretty sure I'm losing my balance here!  Other than using contrasting fabric for the pockets - no other changes were made to the pattern.  At some point, I'm going to make up the Rivermont top too.


The center back has a seam, but I made no attempts to match this fabric anywhere!  There are so many great places to take photos around Carriage Corner!  Thanks Carolyn :D 


Thinking about making up Rivermont?  Remember that dress will look better and you will feel better if you have some negative ease in the finished garment!  While this particular dress feels to 'fancy' to just throw on and wear while I'm making breakfast, I will add some more of these comfortable, easy to wear, easy to dress up or down Rivermonts to my closet - I'd like to say I'll a few in solid colors - but I know that won't happen - bring on the loud prints!  

Have you made a garment that you only sorta like the first go round but adore it the second time you made it?  Share them with me in the comments!  


June 27, 2019

Holyoke

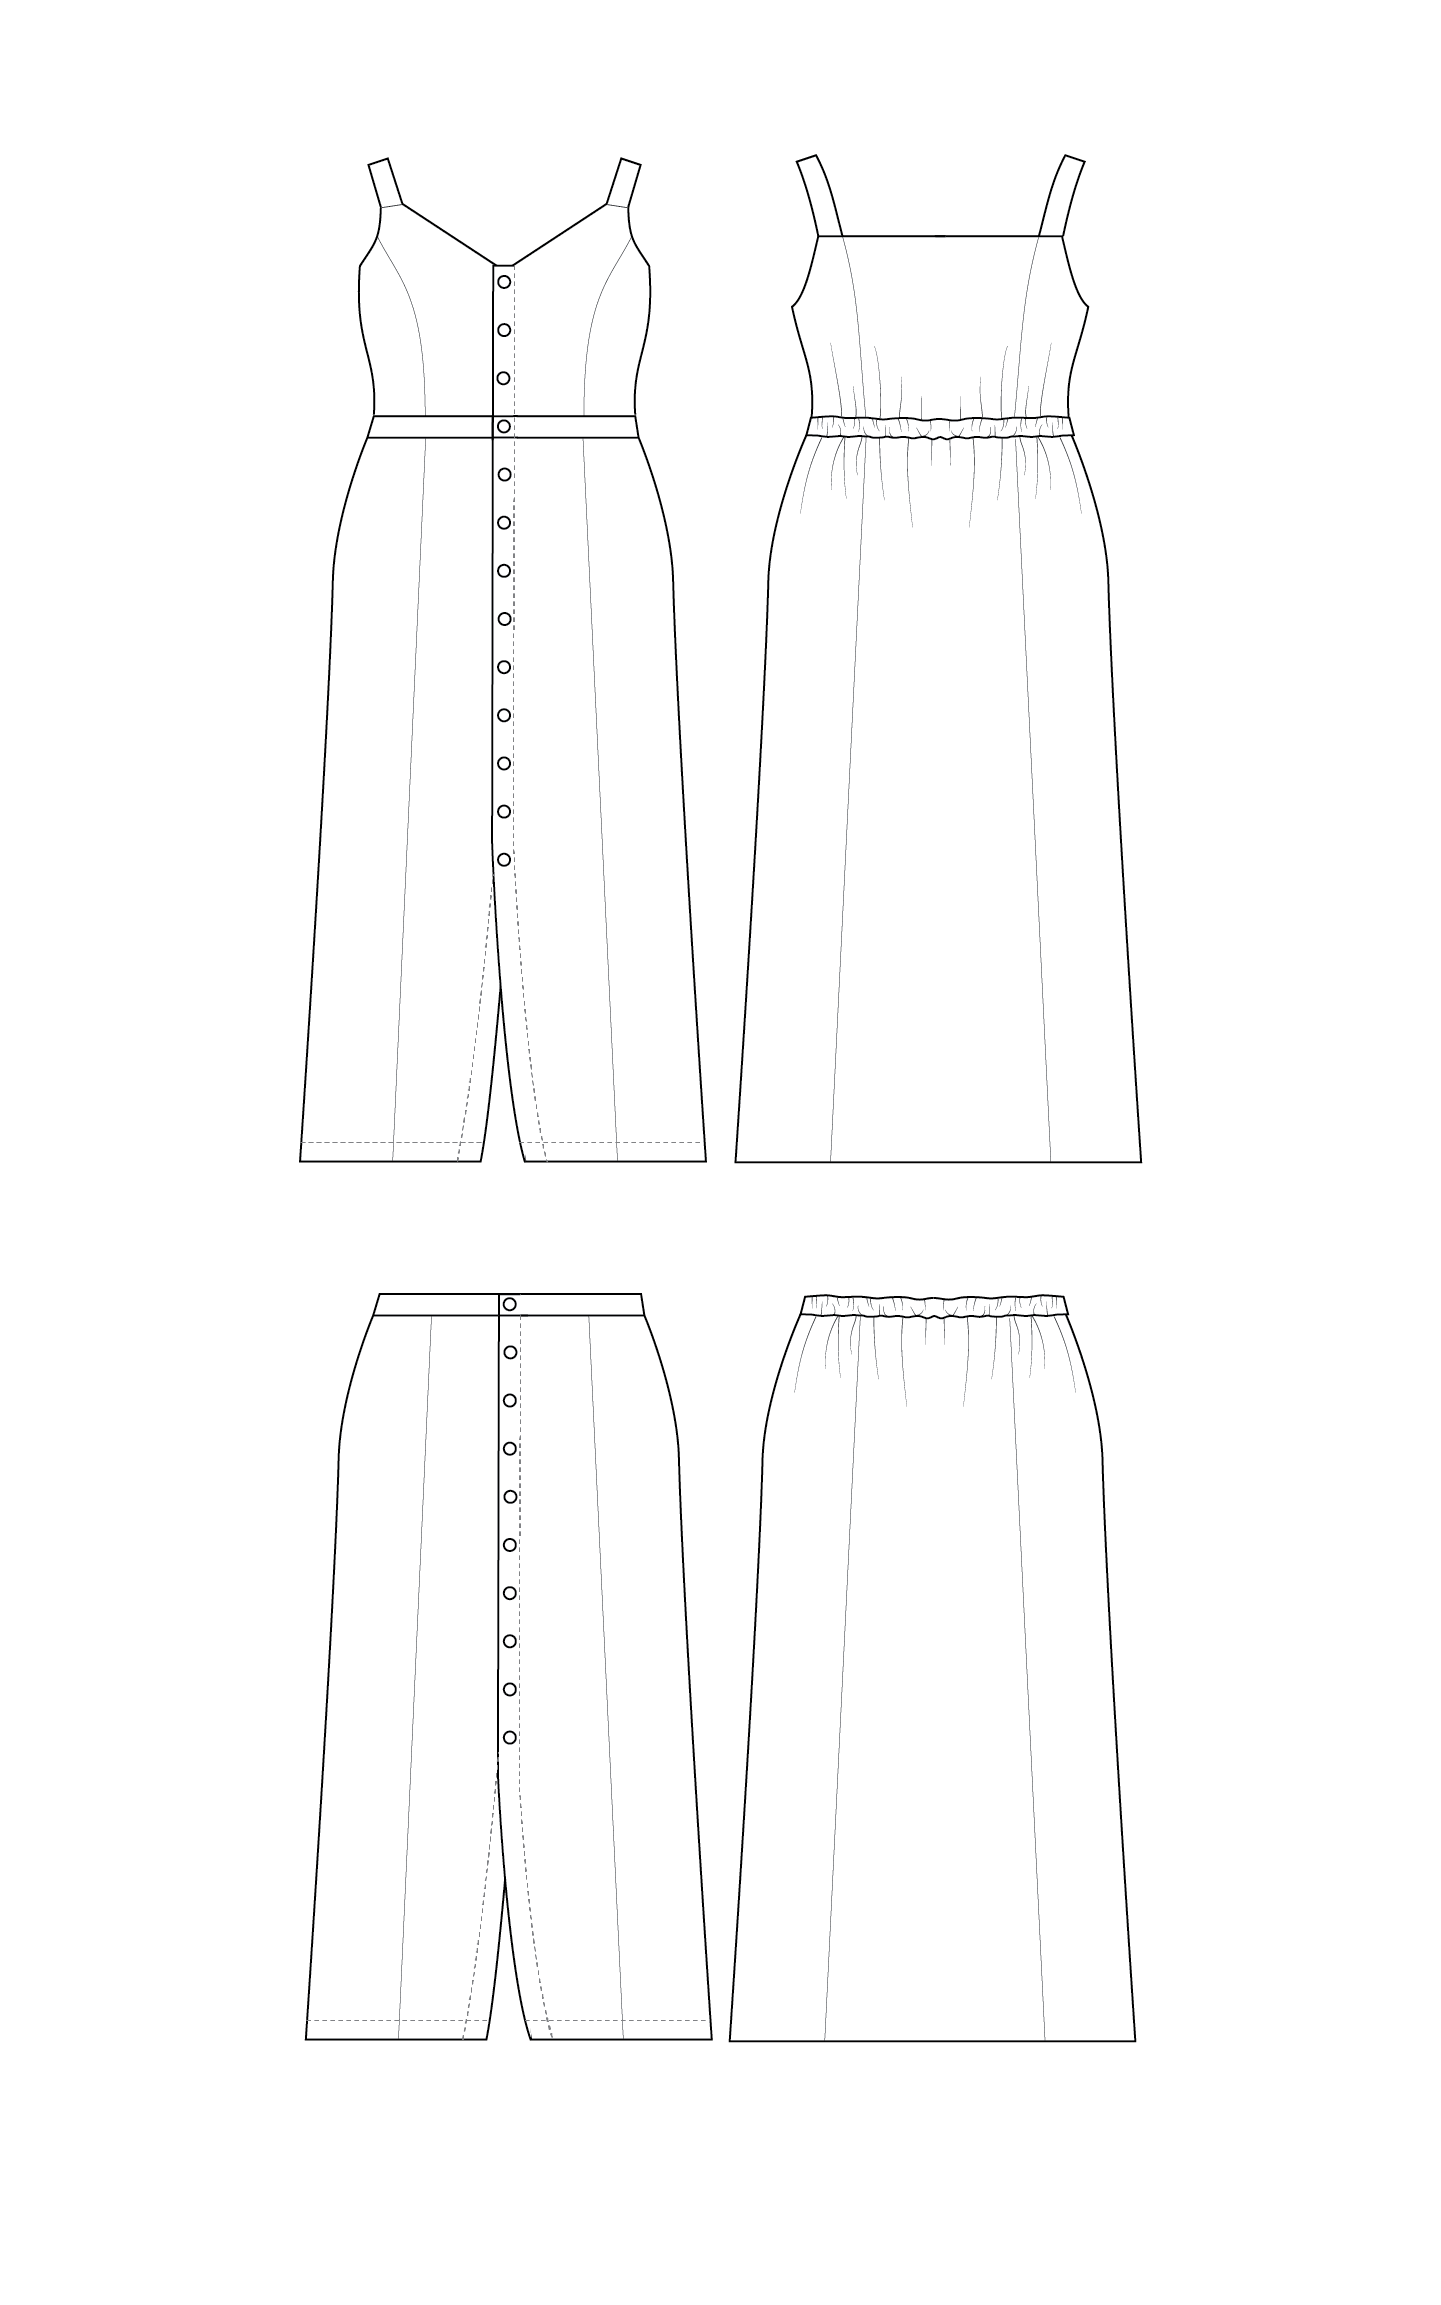
Cashmerette Holyoke Maxi Dress and Skirt sewing pattern
Line drawings
from Cashmerette

Aside:  I was doing so well blogging again and then I ran out of vacations to talk about and already photographed garments.  So, let's try this again - shall we? 

I am a pattern tester for Cashmerette - and I love it!  When the call was sent out for testers for Holyoke, I jumped all over it!  While I can't really see myself wearing the dress - I can absolutely see me wearing the maxi skirt!

The Holyoke has 2 views and both have:


  • Princess seams which are super curve-friendly and allow for easy adjustment; 
  • faux button placket down the front; 
  • elastic at the back waist; 
  • super swooshy maxi length - with is easy to shorten; and 
  • pockets


My test garment was made from some long stashed rayon that has brightly colored buildings all over it.  I love it!  I think I have a green that will coordinate to make a better top than the white I've been wearing it with.  Other notions include elastic, stabilizer and some long stashed and not sure how I was going to use them square green buttons.


I made absolutely no changes to my pattern pieces for this garment!  The only thing I did different than the instructions is to stitch the pockets to the skirt front - I just like that better than the pockets flopping around loose inside my garment.  Bonus - on anything that has a pull on waist - it's really easy to see which side is the front - just sayin'


I've already got another maxi skirt cut out of a quilting cotton and I might consider making the dress if I added a "football' sleeve to it. I also bought some red twill during our Fabric Mart trip to make another - this skirt is a winner!


I can also see this being added as a middie skirt into my closet, in denim as a tribute to Carolyn.


All photos, in this blog post and for the next few are thanks to Carolyn.  If you have trouble getting great photos for your blog - I suggest you find a friend who will make you very uncomfortable and then take the most flattering photos of you ever!  


I was laughing so hard in this one!  Then we pulled JB into the pics and you can see his most recent new shirt - very food themed with knives, forks and spoons all over it!  


So - if you have been looking for the perfect button front skirt, no matter what length you make it - I don't think you can go wrong with this one.  I'm not sure I'll ever make the summer sundress, but as a skirt - it's sure a winner! 

Next Up - the L O N G Sew Camp Review!  

May 16, 2019

Border Print Pembroke

I am a pattern tester for Cashmerette.  When Jenny reached out with the Pembroke for testing - I was totally down for it!  We were due to go to Seattle for a wedding and some new tee shirt dresses were just the ticket!  I made 3 before we went on vacation!

The first one I did just like Jenny's cover dress.  I added the sash - but didn't double the fabric because I was using a fairly substantial ponte knit and I didn't want the bulk of 2 layers.  I did hem the sash for some unknown reason.

Let me also say - I'm rubbish at grading between sizes for my hips.  It's like I have absolutely no idea how big they are!  I know what the tape measure tells me, but even with flat pattern measuring - my garments end up too big at the hips.  Frustrating!

I will say - with each dress, it got smaller and the sway back adjustment got bigger.  I know that Cashmerette has a built in sway back adjustment, but with my very short back length (15") and my prominent behind, I need more.

The second dress was white polka dots on a black ponte background.  I used a solid white ponte for the sleeves and neckband and the polka dots for the sleeve bands.

This dress was not long for the closet.  I think I wore it twice and the ponte pilled horribly.  I couldn't stand it.  I think I have a tiny big of the polka dots left, but I'm not sure I'll use them.  


The third version, I think, fits the best!  And it's my favorite.  The hot pink border was on the fabric and I cut it to use as the neck band.  I fussy cut the sleeves so the border was at the hem.  

The fabric is an ITY from FabricMart ordered in May of 2015 - so it only took 3 years to get sewn up!  


I like this dress in an ITY knit.  I'm finally happy with the length - neither too long nor too short.  


I love the little flippy side vent.  My versions are just slightly longer in the back - although it's not noticeable in this photo.  

While I do finally like this dress, I think the tunic version is next in my to make pile.  I love Carolyn's versions of the tunic with long sleeves and a turtleneck or cowl - I am smitten with Megan's Pembroke tunic dress and really want to add several versions like that to my closet. 

Megan's Beautiful Pembroke Tunic

March 21, 2019

Ellis Skirt

You just recently saw many of these pictures when I talked about the sweater.  But this time - I'm gonna tell you about the skirt.

Again - I am a Cashmerette pattern tester and was provided the pattern in exchange for sewing it up.  But the thoughts and opinions on the skirt are my own.


I used to have a denim skirt very similar to this in my closet and I'm surprised how much I miss it.  This Ellis skirt was sewn in November - after my last round of Whole 30 and I as I learn to be gluten and dairy free.  So, my shape is in flux, just FYI.

Second - there were changes made to the fit of the pattern between testing and release.  I haven't compared my traced pieces to the final pattern - and I should.


Third - for my specific pear shaped issues and sway back on the tester version, I had to create a deep 2" dart in the back yoke to help eliminate gaping at my back waist.  Also - I understand this has been changed in the final pattern - see note above about how lazy I am.

Finally - This is a very traditional denim style skirt - I sewed the 5 pocket version with plain back pockets (that JB didn't take a photo of).  I added the darling coin pocket - which seems tiny and like it sits a bit too high above the other pocket.  I don't know if that's my cheater method of marking or if it really sits that high.


Just the Stats:

Waist:  38"
Hip:  52"
Height:  5'9"
Fabric:  purple stretch denim from deep stash - most likely an ancient joann's purchase from when The Princess worked at a vet and it was purchased to make scrubs. There was just enough for this skirt.

Alterations:  I used the pear shaped pattern pieces and cut a size 18 at the waist and a 20 at the yoke.  I pin fit the pattern to me to get the right hip curve.  I took a class with Peggy Sagers years ago and we figured out *MY Particular Hip curve.

Final size - 16 waist; 18 high hip and somewhere between an 18/20 hip.

I did not add length and I'm happy with where this lands.


Will I make this again? YES!  I need skirts like this in my life.  I find denim skirts so easy to wear and feel put together.  I feel like I look presentable to welcome guests to the B&B as well as feeling 'like me' when I get going for the day.  I definitely need a true denim version - which will get me to comparing test to final pattern.  Watch for that - or maybe don't at my current speed it might take years.

*This is how you do it to find yours.  With elastic holding your garment up - pin fit the side seams.  Very carefully - without removing any of the pins - step out of the garment (pants or skirt).  Turn inside out.  Then using your french curve, place along the pinned seam until it matches.  This is your Hip Curve.  It should not change with size.
LinkWithin Related Stories Widget for Blogs