April 18, 2022

MYOSOTIS - Take 3

 Let's jump right in with the pattern picture, because ya know what?  Mine doesn't look like this.  In fact, only one version even comes close to looking like this.
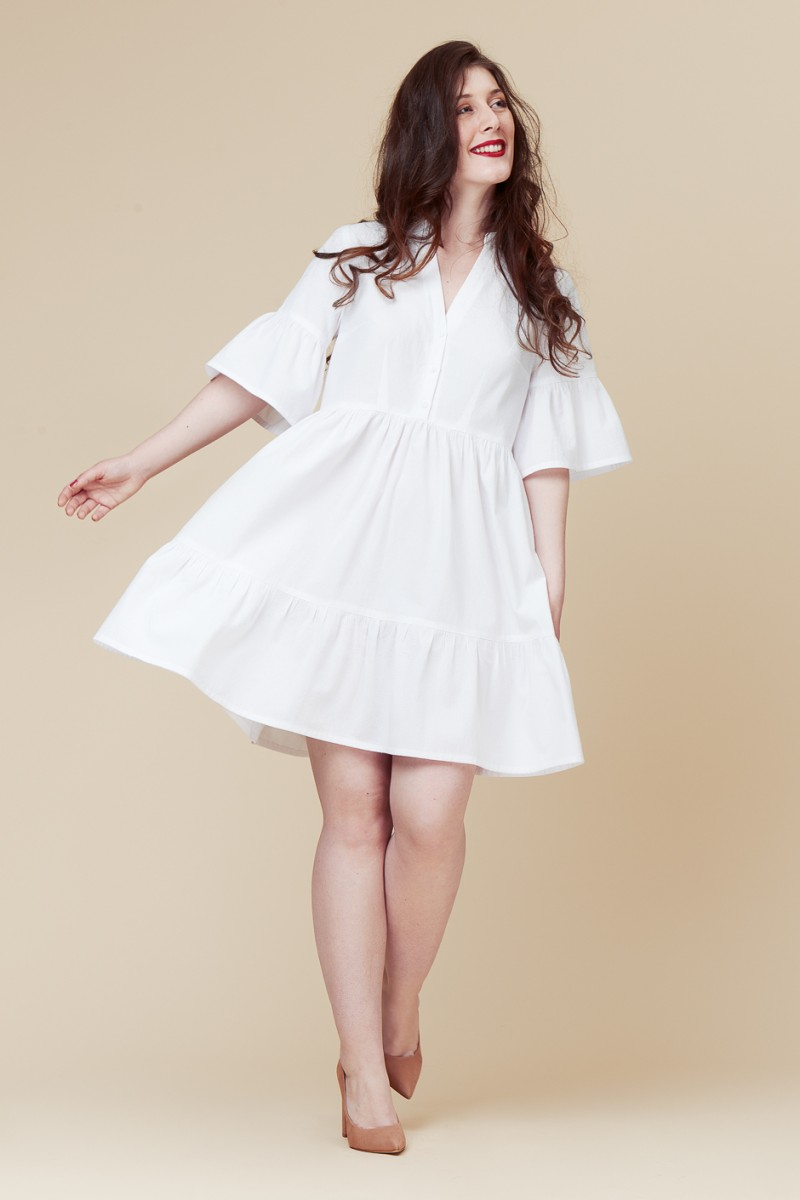
This is the Myosotis Dress by Deer & Doe patterns.  I bought the pattern at FabricMart during a Carriage Corner Sew Camp in either late 2019 or 2020.

During a 2021 pre-vacation must sew a new wardrobe frenzy - I made my first version (promise, I will take photos and blog it soon).  Anyway, that version is fun, but it has issues.

Take a page from Carolyn's book and maxi-fied the dress.  I also used the SunnyGal tutorial to open the neckline up, bring the armholes in and skip the collar.

The fabric was bought at Hobby Lobby on sale and it was so pretty, I just couldn't pass it up.  You know me and a dark floral ::swoon::

Yesterday, I rearranged some of the furniture in our bedroom and pulled out my real camera.  It's nothing fancy and I could use some work on settings rather than leaving everything on auto, but this will do for now.  

All of the pattern changes are to the bodice.  Without looking, I can't even tell you what size I made - remember, I made this dress last August!  What I can tell you is that I moved the shoulders forward 1/2", I lowered the front waist 1/2" so the waist is level.  I used my french curve to bring the armholes in and then I used matching bias to finish them.  I opened the neckline up 1" and honestly, it could use a smidgen more room, and then I redrafted the neckline facings.

Sorry - for the blurry photo - again, figuring it out.  This is the best shot of the back & side that I got.  

For the skirt, I just used 2 width of fabric pieces.  I left the selvedges on the opening side and cut 3" wide interfacing the length of the skirt.  That was then folded in half to create a fully functioning button front.


But, rather than buttons, I used pink pearl snaps.  I am able to purchase these snaps in my favorite dry goods store in town for around $2 a dozen and they work with my snap source snap setter.  I have always liked the look of buttons grouped together, so I decided to put 2 snaps as close together as I could get them with the snap setter, about 1/2" apart.  I think if I had snap pliers, I could have placed them closer together, but it's fine the way it is.  The pairs of snaps are then positioned 2" between each pair.


Final verdict:  I love this dress!  It's swishy and fun and it has pockets!  In fact, I love this version so much, I'm tempted to take V.2 apart to remake the bodice.  If you follow me on Instagram you would have seen V.2 - it's the short border print version made in July 2021!

As I wear the garments I've made in the last couple of years, I will do my best to take some better photos with some different poses!

March 31, 2022

Eleanor's Gingham Quilt

    It all started with a picture on Instagram.  I mean, isn't that how all good stories start?  Miss Andrea Quilts posted a picture of a gingham baby quilt that she made.  And it was stunning! 

    Fast forward a few months and I made a whole cloth quilt for baby Harris (Harris is Eleanor's baby brother).  I have also recently (in the last couple of years) finished Krystle's wedding quilt.  So, it was time to make Eleanor a quilt.

    They came to visit for Thanksgiving.  Miss Eleanor is a little bit opinionated (but she comes by it honestly) and I'm not the greatest at matching fabric so I wanted both her and her mom's input on the fabric selection.

I found this free pattern and used it.  I still have 2 pillowcases to quilt.  Don't judge me.  

I knew the quilt was going to be gingham in design and that E wanted pinks or purples.  In my research, I had found some beautiful quilts where the medium was a print - and I really, wanted that look.  So we started with a dark solid purple and white.  Then found the tiny purple print.  The backing and binding were no brainers - we just pulled them from the same fabric line as the print fabric.  Easy peasy!  


Fast forward to January 12th.  Fifth birthday party is coming up in 13 days and I still have just a stack of fabrics.  Fortunately, I was busy with running Carriage Corner and didn't even start cutting the fabric strips until Friday, January 14th.  I was determined and had the entire top put together by the end of Sunday!  

Whew!  On track to make it to the birthday party with gift in hand!  Except when I put it on our queen size quest bed - it looked huge!  Do I take some rows off?  


The next Thursday, I was able to pin baste the backing, batting and top together and start quilting.  I quilted the entire quilt on my home machine using a walking foot, cotton quilting thread in pale pink on the front and a bluish green on the back.  The quilting lines are 1/4" on either side of every seam line!  Really play up the gingham effect!  

By Friday night (2 days before the party) I had sewn the binding on.  I stitched the binding on the back by hand with big stitch binding.  I used pink perle cotton thread and did a large running stitch to hold the binding in place.  I literally carried the quilt with me all day Saturday, stitching in the car when I had a chance!


Around 9p Saturday, I finished the quilt!  Yeah!!  And I threw it in the washer.  First thing Sunday morning it went into the dryer.  I took it out, folded it up and promptly forgot it when we left for the party!  

Eleanor got her birthday quilt


about 2 weeks later in February when they came to visit.  If you ask her she had a great weekend!  She came to visit Gigi & Gramps, went to an ice festival and Gigi made her a pink quilt that's so cozy and she sleeps better!  All worth it in the end.

And as you can see from the photos - it fits her twin bed perfectly!  She already has the pillow case that matches the backing.  She'll get the other two soon - just as soon as I make her Easter dress.

January 27, 2022

Felt Food Fun

    My daughter has always done 'themed' holidays since she became a mom.  They generally pick the main gift based on what Eleanor asks Santa for and then she asks everyone else to 'fill in' around it.  

Eleanor's Second Christmas

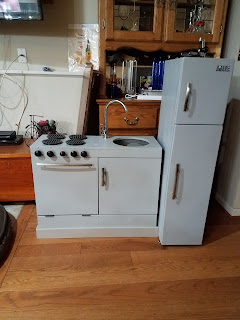
    For Eleanor's second Christmas, Krystle got a 'play kitchen' off facebook market place for nothing and then did her designer remodel on it.  

    Gramps built a fridge, because what kitchen is complete without one?  

Gigi Went Nuts

    I was asked if I could make felt food for the kitchen.  Honestly, I could have bought an entire house full of play food for the amount of time and money I spent.  {And I petered out halfway through the project.}

    I found Sweet Emma Jean on Etsy and I bought 6 patterns:  Pizza;  Summer Cookout (the burgers have grill marks!)); Cookies; Deluxe Lunch; French Toast Breakfast & Taco Dinner!  I then printed out all of my patterns and created a spreadsheet to figure out how much felt to buy and in which colors.  Let me tell you - I way over bought and a friends child might also have a complete set of felt food.  Also, for the Summer Cookout and Deluxe Lunch sets, I doubled everything because if you're playing kitchen you want to be able to have a sandwich with your friend, not make her one and be out of bread! 
 
 
   These patterns use layers of 'stiff felt' to give depth and dimension to the different foods.  If I remember correctly, the bread has 3 layers of stiff felt between the 2 layers of white bread colored wool felt,  The outside is a darker colored felt - to resemble the crust and then the whole thing is sewn together by hand using embroidery floss.  

    
This food was so much fun to make and incredibly realistic.  The strips of bacon have a small piece of pipe cleaner in them so they are flexible like bacon!  Both sides are the same with 'meat' and 'fat' areas on the strip of bacon!  There was even an incredible slice of olive loaf for sandwiches (of course I forgot to take a picture).

Pizza

    The best part of the pizza set was the pizza cutter!  It actually spins!  Gramps cut the pizza peel from thin, hard wood.  The felt food set came with all the toppings!  Olives, mushrooms, bell peppers, onions, pepperoni and cheese sticks with a marinara dipping sauce!  Let's not forget the 6 slices with tomato sauce and cheese!


Back Yard Cookout

    I'm pretty bad at taking photos - but these things were so much fun!  The doritos have a layer of tin foil in them so they bend!  I did sew them with my sewing machine and they are fine.


    Grilled onion on your burger anyone?  There was also lettuce leaves, tomato slices, top & bottom buns with sesame seeds.  But those onion slices were ridiculous!  


    What's a cookout without watermelon?  Can you see how the stiff felt came into play to give this slice of watermelon dimension?  The stiff felt was very hard to stitch through neatly and on the edges you are just sewing around it.  I learned to add any decorative elements first before putting it all together. 


    Finally - have you ever seen such a good looking deviled egg?  This was fun, if a little bit fidly to make.  


Cookies

    I had to learn some new embroidery stitches to really make these look like the store bought version.  

    I don't think I finished all of the cookies!  

Let's Wrap This Up!

    I had to pull all of my supplies out to figure out what was what.  Little H will turn 2 in a few months so it might be time to finish what I started.  If I gift him the French Toast Breakfast - which ham slice & fried egg and the Taco Dinner then Big Sis can't be mad if he plays with her kitchen, right?  
   
    Also, the next time we are there, I need to ask to see the felt food just to see how it's held up to play.
LinkWithin Related Stories Widget for Blogs